概述
基本常识
-
为什么进行越狱开发,以及越狱开发能做什么? 实现一些AppStore上的app无法实现的功能,在越狱机器上,可以精细化控制iOS系统和App做批量自动化操作,增删改系统功能等
-
什么是Theos以及Theos用来干什么? 是目前最流行的跨平台iOS越狱开发工具包,包含越狱开发所有需要的sdk和工具链
-
我该怎样选择开发环境? 为了达到最快的开发速度和生产速度,建议PC使用环境
MacOS + XCode + Theos + VSCode,手机端使用openssh + debugsever + frida进行相关开发,逆向,调试,跟踪,测试。本系列教程均基于该环境开发。为此你需要准备的编程技能至少包括objective-c + c + python + javascript + logos -
推荐学习资源? 论坛: iOSRE, 看雪, 52pojie, ….
常见的越狱软件/插件都有哪些文件类型?
- 资源文件
- Daemon, 可执行程序,为常驻于系统的守护进程,用于执行一些需要系统权限的操作或者实现底层服务
- Tool, 可执行程序,用于实现简单功能,比如lsof,wget
- Tweak, 动态库,随App启动自动注入,用作控制进程
- App, 这里开发的是Root权限执行的App,在桌面存在图标
准备工作
- 确保系统安装homebrew, xcode
- 安装Theos依赖
brew install ldid xz
- 下载TheOS
mkdir /opt # theos将下载到/opt/theos
git clone --recursive https://github.com/theos/theos.git /opt/theos
*** 小技巧: 如果git下载比较慢又不想用vpn,可以用gitee的’导入Github仓库’功能,借助gitee下载***
- 增加iOS私有函数库
curl -LO https://github.com/theos/sdks/archive/master.zip
TMP=$(mktemp -d)
unzip master.zip -d $TMP
mv $TMP/sdks-master/*.sdk /opt/theos/sdks
rm -r master.zip $TMP
简单实例
创建工程
执行/opt/theos/bin/nic.pl得到如下结果
NIC 2.0 - New Instance Creator
------------------------------
  [1.] iphone/activator_event
  [2.] iphone/activator_listener
  [3.] iphone/application_modern
  [4.] iphone/application_swift
  [5.] iphone/control_center_module-11up
  [6.] iphone/cydget
  [7.] iphone/flipswitch_switch
  [8.] iphone/framework
  [9.] iphone/library
  [10.] iphone/notification_center_widget
  [11.] iphone/notification_center_widget-7up
  [12.] iphone/preference_bundle_modern
  [13.] iphone/theme
  [14.] iphone/tool
  [15.] iphone/tool_swift
  [16.] iphone/tweak
  [17.] iphone/tweak_with_simple_preferences
  [18.] iphone/xpc_service
  [19.] iphone/xpc_service_modern
Choose a Template (required):
这里每行都是一种工程类型,其中[14]用于生成iOS无界面的可执行程序,[16]用于生成注入App的动态库。这两个是最常用的项目。如果打算开发完整越狱App,仍然要借助XCode。这里按如下操作,会产生helloworld目录:
Choose a Template (required): 16
Project Name (required): helloworld
Package Name [com.yourcompany.helloworld]: helloworld
Author/Maintainer Name [apple]: helloworld
[iphone/tweak] MobileSubstrate Bundle filter [com.apple.springboard]: com.apple.springboard
[iphone/tweak] List of applications to terminate upon installation (space-separated, '-' for none) [SpringBoard]: SpringBoard
配置手机环境
安装tcprelay
tcprelay将usb连接的手机端口映射到本地端口,这样登录手机将非常方便,同时传文件速度非常快。远程ssh登陆到手机,将会面临网络不稳定的问题,操作比较痛苦
- iPhone Cydia商店中安装openssh
brew install libusbmuxd- 从
https://gitee.com/lich0/jailbroken_programming_lesson/tree/master/tools获取tcprelay.py和usbmux.py - 执行
sudo python3 tcprelay.py -t 22:22(注意因为端口号小于1024所以必须root权限执行)
期间可能遇到的问题:
- 如果首次连接手机,会如下提示,按yes即可
The authenticity of host '127.0.0.1 (127.0.0.1)' can't be established.
RSA key fingerprint is SHA256:z5N37rPCpeTKcIcm1tx3x3DnkTfeaESagZWuTYnmD3E.
Are you sure you want to continue connecting (yes/no/[fingerprint])?
- 如果对多台iPhone采用上述操作,那么会产生knownhost冲突,如下所示
@@@@@@@@@@@@@@@@@@@@@@@@@@@@@@@@@@@@@@@@@@@@@@@@@@@@@@@@@@@
@    WARNING: REMOTE HOST IDENTIFICATION HAS CHANGED!     @
@@@@@@@@@@@@@@@@@@@@@@@@@@@@@@@@@@@@@@@@@@@@@@@@@@@@@@@@@@@
IT IS POSSIBLE THAT SOMEONE IS DOING SOMETHING NASTY!
Someone could be eavesdropping on you right now (man-in-the-middle attack)!
It is also possible that a host key has just been changed.
The fingerprint for the RSA key sent by the remote host is
SHA256:z5N37rPCpeTKcIcm1tx3x3DnkTfeaESagZWuTYnmD3E.
Please contact your system administrator.
Add correct host key in /Users/apple/.ssh/known_hosts to get rid of this message.
Offending RSA key in /Users/apple/.ssh/known_hosts:2
RSA host key for 127.0.0.1 has changed and you have requested strict checking.
Host key verification failed.
此时需要将设备公钥加入到本机,按如下方式操作:
ssh-keyscan 127.0.0.1 >> ~/.ssh/known_hosts
- 为避免每次登陆手机输入密码,按如下操作
ssh-copy-id root@127.0.0.1 # 密码默认为alpine
部署日志查看工具
git clone https://github.com/rpetrich/deviceconsole.git
使用XCode编译出deviceconsole并放到$PATH下,这样每次USB连接iPhone后执行deviceconsole就能看到日志(支持iOS12及以下系统)
开发hellowolrd
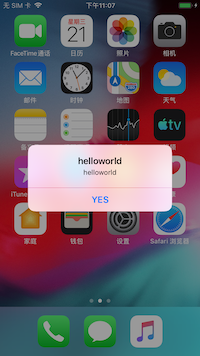
我们的helloworld是在SpringBoard启动时做个弹窗。SpringBoard可以理解为桌面进程。效果为每次杀死SpringBoard进程时会在桌面弹窗。使用VSCode打开helloworld目录,可以看到存在4个文件:
- control 指定生成的deb的基本信息,包括包名,版本,安装依赖及作者信息
- helloworld.plist 用于指定自动注入的进程,这里可以看到指定为springboard
- Makefile
- Tweak.x 代码
工程在https://gitee.com/lich0/jailbroken_programming_lesson/tree/master/junior1_helloworld
执行make package install到手机后,得到最终效果如图
Daemon开发
Daemon是由系统管理的后台服务,如果服务进程崩溃或退出,系统会及时拉起实现常驻
简单Daemon
以下代码借鉴自frida源码,实现了自举Daemon,适用于Android/Linux/Mac/iOS越狱开发
static int fds[2];
int flag;
pipe(fds);
flag = fcntl(fds[0], F_GETFL, 0);
fcntl(fds[0], F_SETFL, flag | O_NONBLOCK);
flag = fcntl(fds[1], F_GETFL, 0);
fcntl(fds[1], F_SETFL, flag | O_NONBLOCK);
int forkpid = fork();
if (forkpid < 0) {
    return -1;
} else if (forkpid > 0) { // father
    sleep(1);
    return 0;
}
setsid();
chdir("/");
umask(0);
int null_in = open("/dev/null", O_RDONLY);
int null_out = open("/dev/null", O_WRONLY);
dup2(null_in, STDIN_FILENO);
dup2(null_out, STDOUT_FILENO);
dup2(null_out, STDERR_FILENO);
for(unsigned int i = 0; i < 1024; i++) {
    close(i);
}
iOS Daemon
简单测试脚本/layout/tmp/test.sh
#!/bin/sh
echo $2 >> /tmp/testlog >> /tmp/testlog
sleep 5
/Library/LaunchDaemons/test.plist
<?xml version="1.0" encoding="UTF-8"?>
<!DOCTYPE plist PUBLIC "-//Apple//DTD PLIST 1.0//EN" "http://www.apple.com/DTDs/PropertyList-1.0.dtd">
<plist version="1.0">
<dict>
    <key>KeepAlive</key>
    <true/>
    <key>Label</key>
    <string>test</string>
    <key>ProgramArguments</key>
    <array>
        <string>/bin/bash</string>
        <string>/tmp/test.sh</string>
    </array>
    <key>RunAtLoad</key>
    <true/>
</dict>
</plist>
/layout/DEBIAN/prerm
#!/bin/sh
if [[ $1 == remove || $1 == purge ]]; then
    if [ -f "/Library/LaunchDaemons/test.plist" ]; then
      /bin/launchctl unload /Library/LaunchDaemons/test.plist
    fi
fi
exit 0

/layout/DEBIAN/extrainst_内容
```sh
#!/bin/sh
if [[ $1 == upgrade ]]; then
    if [ -f "/Library/LaunchDaemons/test.plist" ]; then
      if [ ! -d "/usr/lib/TweakInject" ]; then
        /bin/launchctl unload /Library/LaunchDaemons/test.plist
        /bin/launchctl load /Library/LaunchDaemons/test.plist
      else
        /bin/launchctl kickstart -k system/test
        /bin/launchctl load /Library/LaunchDaemons/test.plist
      fi
    fi
elif [[ $1 == install ]]; then
    if [ -f "/Library/LaunchDaemons/test.plist" ]; then
      /bin/launchctl load /Library/LaunchDaemons/test.plist
    fi
fi
exit 0
Deb部署动作
有时为了实现编译或安装阶段的自定义,需要在这些阶段执行脚本,而Cydia越狱环境和TheOS开发环境提供了以下功能。
Makefile命令
在Makefile中使用命令,不会打包到deb文件中,所以只在开发时执行
before-install::
    install.exec "echo before-install"
before-uninstall::
    install.exec "echo before-uninstall"
after-install::
    install.exec "echo after-install"
after-uninstall::
    install.exec "echo after-uninstall"

# 子命令:
install.exec 执行命令
install.copyFile 拷贝文件
Debian控制命令
在项目layout中创建DEBIAN目录,根目录control须移动到该目录下,该目录还支持如下脚本文件
- preinst 在Deb包文件解包之前,将会运行该脚本。许多“preinst”脚本的任务是停止作用于待升级软件包的服务,直到软件包安装或升级完成。
- postinst 该脚本的主要任务是完成安装包时的配置工作。许多“postinst”脚本负责执行有关命令为新安装或升级的软件重启服务。
- prerm 该脚本负责停止与软件包相关联的daemon服务。它在删除软件包关联文件之前执行。
- postrm 该脚本负责修改软件包链接或文件关联,或删除由它创建的文件。
- extrainst_ 安装是执行,升级时不执行